Battery switch on travel trailer function is crucial for managing power and preventing electrical issues. Understanding how your battery switch works is key to safely and efficiently using your travel trailer’s electrical system. This guide will walk you through the different types of switches, wiring diagrams, operation, troubleshooting, and essential safety precautions. We’ll cover everything from choosing the right switch for your battery type to diagnosing problems and preventing future issues.
We’ll explore the interplay between your battery switch and various power sources like shore power, generators, and solar panels. Learn how to properly manage power flow to avoid damaging your appliances or even causing a fire. We’ll also delve into the specific considerations for using different battery types, such as lead-acid and lithium, and how they impact your switch’s functionality.
Safety is paramount, so we’ll cover essential precautions to protect yourself while working with your travel trailer’s electrical system.
Battery Switch and Power Management in Travel Trailers: Battery Switch On Travel Trailer Function
Your travel trailer’s battery switch is a crucial component for managing power from various sources and preventing electrical issues. Understanding its function and proper usage is key to enjoying reliable power on the road. This section will explain how the battery switch works, its importance, and best practices for its maintenance.
Battery Switch Functionality
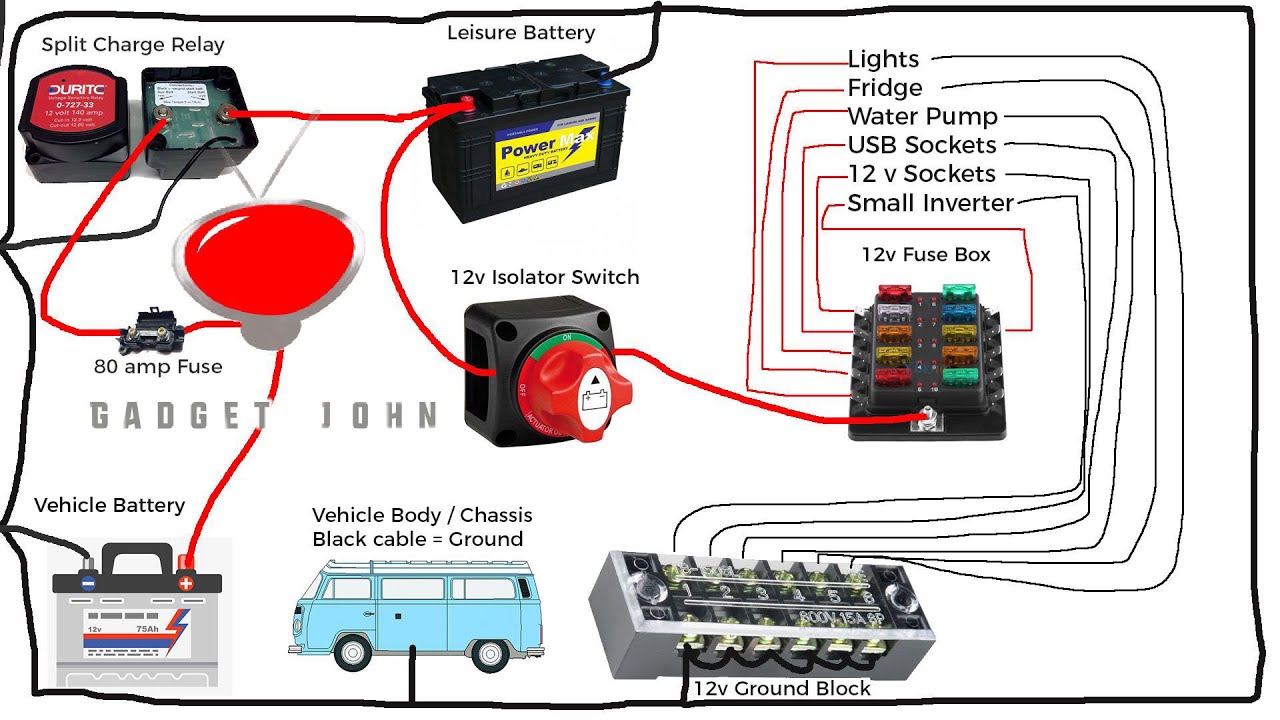
The battery switch acts as a central control point, directing power flow between your trailer’s batteries and external power sources like shore power (hookups at campsites), a generator, or solar panels. In most setups, it allows you to disconnect the house batteries completely, preventing drain when the trailer is stored for extended periods. It also allows selection of which power source feeds the trailer’s 12V system, ensuring efficient and safe power distribution.
Some switches also include a “combined” position that allows both shore power and the batteries to power the trailer simultaneously.
Importance of Proper Battery Switch Usage
Correct battery switch operation is essential to avoid several electrical problems. Improper usage can lead to battery drain, premature battery failure, blown fuses, and even damage to sensitive electronic components in your RV. For instance, leaving the switch in the “on” position while the trailer is not connected to shore power or a generator will quickly deplete your batteries.
Conversely, switching to the battery-only position when the generator or shore power is supplying power can lead to backfeeding and potential damage.
Power Flow Diagram
Imagine a simple flowchart:* Start: The power source (Shore Power, Generator, or Solar)
Battery Switch
Off
All power to the house batteries and the 12V system is cut off.
Battery
Only the house batteries power the 12V system.
Shore/Generator
The shore power or generator powers the 12V system, bypassing the batteries.
Combined
Both the house batteries and the shore power/generator power the 12V system.
End
The 12V system in your travel trailer.This simplified diagram shows the basic power flow. More complex systems may include additional components like battery chargers or inverters.
Potential Problems from Incorrect Operation
Incorrect battery switch operation can result in several issues:
- Dead Batteries: Leaving the switch in the “on” or “combined” position without an external power source will drain your batteries.
- Overcharging: Incorrect settings can lead to overcharging, damaging your batteries and shortening their lifespan.
- Backfeeding: Attempting to charge batteries through the switch when it’s in the wrong position can cause backfeeding, potentially damaging the charging system.
- Electrical Damage: Backfeeding can also damage other sensitive electrical components within the trailer.
Best Practices for Battery Switch and Wiring Maintenance
Regular maintenance of your battery switch and associated wiring is crucial.
- Regular Inspection: Visually inspect the switch and wiring for any signs of corrosion, loose connections, or damage. Tighten any loose connections.
- Corrosion Prevention: Apply a corrosion inhibitor to terminals and connections to prevent corrosion buildup.
- Wiring Integrity: Ensure that all wiring is properly secured and protected from abrasion or damage.
- Professional Service: If you notice any problems, consult a qualified RV technician for repairs or maintenance.
Types of Batteries and Their Compatibility with Battery Switches

Choosing the right battery and battery switch for your travel trailer is crucial for reliable power. Different battery types have varying voltage outputs, charging requirements, and sensitivities, impacting their compatibility with various switches. Understanding these differences ensures safe and efficient operation.
Lead-acid and lithium batteries are the most common choices for RVs. Lead-acid batteries, while affordable, are heavier, less efficient, and have a shorter lifespan than lithium. Lithium batteries offer higher capacity, longer lifespan, faster charging, and lighter weight, but come with a higher initial cost.
Lead-Acid Battery Compatibility
Lead-acid batteries, including flooded, gel cell, and AGM types, are generally compatible with most standard battery switches. These switches are designed to handle the lower voltage and slower charging rates of lead-acid. However, using an incorrect switch could lead to improper charging or potential damage to the battery. For example, a switch not rated for the amperage of your battery bank could overheat and fail.
So, you’re planning a trip? Awesome! Don’t forget travel insurance – it’s a lifesaver. Check out aon travel insurance for comprehensive coverage. They offer various plans, so you can find one that fits your budget and adventure level. Speaking of adventures, if you’re looking for something truly epic, aon travel insurance is also a great option to consider, especially if you’re booking through Breathtaking Expeditions.
Get insured and explore the world with peace of mind!
Always check the switch’s specifications to ensure compatibility with the voltage and amperage of your lead-acid batteries.
Lithium Battery Compatibility
Lithium batteries present unique considerations when paired with battery switches. Their higher voltage and faster charging rates require switches specifically designed for lithium-ion technology. Using a standard lead-acid switch with lithium batteries can lead to premature battery failure, damage to the switch, or even fire hazards. Lithium battery switches often incorporate features like Bluetooth monitoring and advanced charging algorithms to optimize battery performance and lifespan.
For instance, a lithium-compatible switch might include features to prevent overcharging, which is crucial for extending the life of lithium batteries.
Impact of Battery Type on Switch Functionality
The type of battery significantly influences the functionality of the battery switch. A simple on/off switch works adequately for lead-acid batteries, but a lithium battery system might need a more sophisticated switch that manages charging profiles, balancing cells, and monitoring battery health. The switch’s amperage rating is also crucial; lithium batteries can handle higher charging currents, necessitating a switch with a higher rating to prevent overheating.
For example, a 100-amp switch might suffice for a lead-acid system, while a 200-amp switch or even higher might be necessary for a high-capacity lithium system.
Safety Precautions
Working with batteries, especially lithium batteries, requires careful attention to safety. Always wear appropriate safety glasses and gloves. Ensure adequate ventilation when working with lead-acid batteries to avoid exposure to hydrogen gas. Lithium batteries pose a fire risk if improperly handled or damaged; never puncture or short-circuit them. Always follow the manufacturer’s instructions for both the batteries and the switch.
So, you’re planning a trip? Awesome! Don’t forget travel insurance! Check out aon travel insurance for comprehensive coverage. They’ve got options for everything from lost luggage to medical emergencies. Speaking of medical, another great place to look for a solid plan is aon travel insurance , they often have special deals depending on your destination.
Seriously, don’t skip this step; peace of mind is priceless!
When connecting or disconnecting batteries, always start with the negative (-) terminal first to avoid accidental short circuits.
Battery Switch and Battery Type Compatibility Chart
This chart provides a general guideline. Always refer to the manufacturer’s specifications for both the battery and the switch to ensure compatibility.
| Battery Type | Suitable Switch Type | Considerations |
|---|---|---|
| Flooded Lead-Acid | Standard Battery Switch | Amperage rating must match or exceed battery bank amperage. |
| Gel Cell Lead-Acid | Standard Battery Switch | Amperage rating must match or exceed battery bank amperage. |
| AGM Lead-Acid | Standard Battery Switch | Amperage rating must match or exceed battery bank amperage. |
| Lithium Iron Phosphate (LiFePO4) | Lithium-compatible Battery Switch (with BMS) | Requires a switch designed for higher voltage and amperage, often with integrated Battery Management System (BMS) features. |
Troubleshooting Common Battery Switch Problems
Dealing with a non-functional battery switch in your travel trailer can be frustrating, but systematic troubleshooting can usually pinpoint the problem. This section Artikels steps to diagnose and resolve common issues, getting you back on the road quickly.
Diagnosing a Dead Battery Situation
A dead battery in your travel trailer doesn’t automatically mean the battery itself is faulty. The battery switch could be the culprit. First, check if the switch is in the correct position. If it’s off, obviously that’s your problem. If the switch is in the “on” position and the battery is still dead, there are a few other areas to examine.
Check your battery’s voltage using a multimeter. A low voltage reading (significantly below 12V for a 12V battery) indicates a charging problem or a deeply discharged battery. If the voltage is normal and the battery still isn’t powering your appliances, then focus your attention on the switch and its connections.
Checking for Blown Fuses and Damaged Wiring, Battery switch on travel trailer function
The battery switch often has an inline fuse protecting it from excessive current draw. Locate the fuse (usually near the switch or in the battery compartment) and visually inspect it for a broken filament. A blown fuse indicates a short circuit somewhere in the system. Replace the fuse with one of the same rating. If the new fuse blows immediately, you have a short circuit that needs to be addressed by tracing the wiring for any bare wires touching metal or damaged insulation.
Carefully inspect all wiring connected to the battery switch, looking for any signs of damage like fraying, melting, or corrosion. Loose connections can also cause intermittent power issues.
Testing the Battery Switch
To test the switch itself, you’ll need a multimeter. First, disconnect the wiring from the switch. Set your multimeter to measure continuity (usually represented by a symbol resembling a diode). Touch the probes to the terminals of the switch. If the switch is working correctly, you should get a reading of near zero ohms when the switch is “on” and an infinite reading (or OL) when it’s “off.” A faulty switch will not show this consistent change in resistance.
A lack of continuity in either position indicates a problem within the switch itself, requiring replacement.
Replacing a Faulty Battery Switch
Replacing a battery switch is a relatively straightforward task, but always disconnect the negative battery terminal before starting any work. Once disconnected, carefully remove the old switch from its mounting location. Note the wiring connections before disconnecting them to ensure correct reconnection of the new switch. Install the new switch, making sure the connections are secure and properly insulated.
Reconnect the battery’s negative terminal. Test the new switch to verify proper operation.
Preventing Future Battery Switch Problems
Regular maintenance is key to avoiding battery switch problems. Periodically inspect the wiring for any signs of damage or corrosion. Tighten any loose connections. Inspect the fuse and replace it if it shows signs of wear. Also, keep the battery switch and its surrounding area clean and dry to prevent corrosion.
Regularly check the battery’s voltage and charging system to ensure proper operation. This preventative maintenance will extend the life of your battery switch and prevent unexpected power failures.
Safety Considerations When Using a Battery Switch
Using a battery switch in your travel trailer offers convenience and control over your power systems, but it’s crucial to understand the inherent risks involved. Improper use can lead to serious injury or damage to your equipment. Always prioritize safety when working with batteries and electrical systems.
Potential Dangers of Incorrect Battery Switch Operation
Incorrect operation of the battery switch can result in several dangerous situations. For instance, accidentally connecting the house batteries to the chassis batteries while the engine is running can lead to a significant voltage surge, potentially damaging sensitive electronics or even causing a fire. Conversely, failing to properly disconnect the batteries before working on the electrical system can expose you to potentially lethal electrical shocks.
Furthermore, improper handling of batteries can lead to acid burns or explosions.
Importance of Disconnecting Batteries Before Electrical Work
Before undertaking any work on your travel trailer’s electrical system, always disconnect both the house and chassis batteries. This is paramount for your safety. Even seemingly minor tasks, like replacing a lightbulb or inspecting wiring, carry the risk of electrical shock if the batteries remain connected. The simple act of disconnecting the batteries creates a safe working environment, eliminating the risk of accidental contact with live wires.
Safety Guidelines for Handling Batteries and Electrical Components
When working with batteries, wear appropriate personal protective equipment (PPE). This includes safety glasses to protect your eyes from splashes of battery acid, rubber gloves to prevent acid burns, and closed-toe shoes to protect your feet. Always work in a well-ventilated area to avoid inhaling potentially harmful fumes. Never short-circuit the battery terminals, as this can generate intense heat and potentially cause a fire or explosion.
When handling electrical components, ensure your hands are dry to minimize the risk of shock.
Safe Working Practices Around the Battery Switch
Imagine a scenario: you’re working near the battery switch, which is typically located in a compartment under the trailer. Before you begin, ensure the area is well-lit. Visually inspect the battery switch and surrounding wiring for any signs of damage or corrosion. Then, clearly mark the switch positions (“ON,” “OFF,” and any other positions) with a durable label.
Next, using insulated tools, carefully disconnect the negative (-) terminal of each battery first, followed by the positive (+) terminal. Once the batteries are disconnected, you can safely work on the electrical system. After completing your work, reconnect the positive (+) terminals first, then the negative (-) terminals.
Safety Precautions for Preventing Electrical Shocks and Other Hazards
A comprehensive approach to safety includes several key precautions:
- Always use insulated tools when working with electrical components.
- Never touch bare wires or terminals while the batteries are connected.
- Inspect wiring for any signs of damage or fraying before use.
- Ensure proper ventilation when working with batteries to avoid harmful fumes.
- Keep children and pets away from the work area.
- If you are unsure about any aspect of the work, consult a qualified electrician.
- Have a fire extinguisher readily available in case of emergency.
- Use a multimeter to verify that the batteries are indeed disconnected before commencing any work.
Mastering your travel trailer’s battery switch is about more than just turning power on and off; it’s about understanding how to safely and effectively manage your power sources and protect your investment. By following the guidelines and troubleshooting steps Artikeld here, you’ll be well-equipped to handle any electrical situation that arises. Remember, always prioritize safety and consult a professional if you’re unsure about any aspect of your RV’s electrical system.
Safe travels!
Questions and Answers
What happens if I accidentally leave my battery switch in the “off” position?
You’ll lose power to your house batteries, meaning no lights, appliances, or water pump will work. You may still have power from shore power if connected and your converter is functioning correctly.
Can I use any type of battery with any battery switch?
No. Some switches aren’t compatible with lithium batteries. Check your switch’s specifications and your battery’s requirements to ensure compatibility. Using an incompatible switch can damage your batteries or even cause a fire.
How often should I check my battery switch and connections?
It’s a good idea to visually inspect your battery switch and connections at least once a year, or more frequently if you notice any issues. Look for corrosion, loose connections, or any signs of damage.
My battery switch is making a clicking sound. What’s wrong?
This often indicates a problem with the switch itself or a low battery voltage. Try cleaning the connections and testing your battery voltage. If the problem persists, the switch may need replacing.
